The Safest* and EASIEST Way to Root Your Android Phone and install a custom ROM !


3. Install the Recovery Tools App from play store.
Things Needed :
1. KINGO ROOT ( http://goo.gl/onz12b ) (Needed to root your phone)
(Below things are needed only if you want to install a custom ROM)
2. Recovery Image (Google for your phone )
(Below I have provided image file for MICROMAX CANVAS-A110)
3. Recovery Tools Android App to install the above image ( http://goo.gl/3MtXcd )
4. CUSTOM ROM
4.1 Go cyanogenmod.org and find one. (http://goo.gl/5xNLw)
4.1 Go cyanogenmod.org and find one. (http://goo.gl/5xNLw)
4.3 searches on xda-developers.com
4.3 last option Google it!!
CHOOSE THE ROM AND RECOVERY.IMG FILE WISELY
DOBULE CHECK THESE FILES BEFORE YOU FOLLOW THE PROCESS, OR RESULTS COULD BE A BRICKED PHONE.
A SOFT BRICKED PHONE CAN BE REPAIRED !!
Make SURE you have more than 50% of battery while doing this!
Process :
1. ROOTING the Phone (RISK FREE)
- The download and install Kingo root.
- Plug in your phone after enabling the developer mode.
- after phone detected it will download the drivers and root your phone automatically.
- Now there must be an app by the name "SUPERSU" which means the phone is rooted now.
- YOUR PHONE IS ROOTED NOW follow the below steps if you want to install a custom ROM otherwise you are good to go now !
2. Now we will install the recovery image.
There are two famous recoveries :
>ClockworkMod Recovery is also known as CWM
The volume buttons are used to move the cursor up and down and the power button is used to select in this recovery.
>TEAMWin recovery is also known as TWRP.
this recovery has touch based controls
I personally like CWM. (And describing the same in this tutorial )
- Search for your phone these images are phone specific cross check before you download.
- Rename it as "recovery. img"
- Copy the image in the memory card at root position.
- Now step 3 is used to install this image file.
3. Install the Recovery Tools App from play store.
- Open the App and it will ask for the SUPER USER permission press allow otherwise it won't
Work. - Click on the first button "Flash other Recovery"
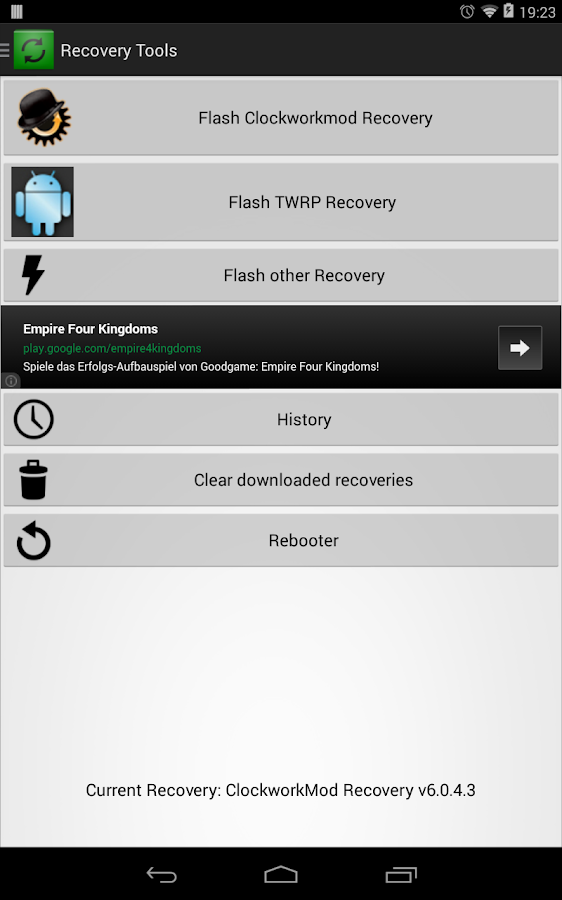
- Choose the file and it will install the recovery image automatically.
- Now it will ask to boot in recovery cancel that we will do this later.
- Now we have a rooted phone with a custom recovery
3. Now put the ROM file on your Memory Card,
The ROM should be a compressed format, don't extract it .
4. Installing the ROM :
- Open the recovery tools app.
- Select the reboot option to boot into the recovery. It will look something like this (if you have used the CWM recovery) :
- NOW A SAFETY STEP : Now go in backup and restore option and back your ROM, can be used to go to the stock ROM. Backups can be up to 5GB make sure you have space on your card. Later you can put this back up folder on your PC to save space on your card.
- After the backing up choose wipe data/ factory reset
- Now wipe cache partition
- From Advance Menu Do Dalvik Catch Clear
- From Advance Menu Do Battery State Clear
- Now from the mounts and storage choose format /system
- Now take care that you don't choose REBOOT SYSTEM by mistake !!
- Now choose install zip from the SD card and choose the ROM from the list which comes up.
- ROM setup will start, press next if the setup asks you.
- As the setup completes choose a reboot system now (choose only after the ROM has been installed) .
NOW YOU HAVE A ROOTED ANDROID PHONE WITH CUSTOM ROM.
In future if you want to install a new ROM, just follow steps 4 and this time no need to make the back up as we have a back up of STOCK ROM which we made earlier.
WARNING : Never do a master reset (FACTORY DATA RESET) from the phone settings unless you have a cyanogenmod.
THANK YOU !!
No comments:
Post a Comment